How To Start A Worm Farm For Vermicomposting At Home
Do you want to join the group of worm farmers but only have a small space? Or perhaps you are looking for ways to turn your kitchen waste into nutrient-rich compost. You can turn to worm farming.
Worm farming or Vermiculture is an eco-friendly way to convert organic material and food scraps into rich worm compost or fertilizers for your garden soil. But what exactly is a worm farm, and how can you start one?
Read on as we wriggle into the world of worm farming and how you can start a worm farm right in your home.
What is a worm farm?

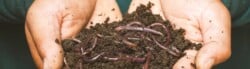
Worm farms are compost spaces containing lots of worms. These worms feed on food scraps and other organic matter like leaves and paper. As they feed on food waste, they make their nutrient-rich fertilizer known as vermicompost, worm poop, or worm tea.
Worm farming started as more of a hobby. However, today it has grown to be a profitable business niche. You can create a homemade worm farm to help feed your garden rich compost or start one for profit. Worm frames are also fairly self-contained, making them perfect for urban composting and an ideal solution for making use of food waste. Worms are in high demand among good producers who need them for soil nourishment. They are also sold to fishers via bait shops.
What to consider when starting your worm farm
If this is your first time raising worms, you need to consider a few things, including the worm species, the type of worm farm, and worm bedding, amongst other factors.
Type of worm farm
You can choose between two types of worm farms/bins: The stacked worm bin or the continuous flow worm bin. The stacked worm bins come in frames stacked on each other and a sump that collects liquids.
On the other hand, the continuous flow worm bins are single barrels and come with an open cavity to house the worms. The base is secured to hold the worm castings together while allowing air to circulate.
Worm species

Some worms are better for worm farming than others. Red worms, also known as tiger worms or red wigglers, are the best worms for farming. They breed fast and grow well in suitable worm farming environments.
You won’t find these types of worms in your garden, so you would need to purchase them online or at a hardware store. Needless to say, not every store has stocks of worms, so you’re best to call in advance to check before making the trip. You’ll also find other worm farming enthusiasts online who may help you get started.
European night crawlers will also work well in your own worm composting bin. However, they are slower breeders. Ideally, you need a minimum of 500 worms to start your farm.
Worm bedding
Your worms will need porous and moist bedding to do their work. For your worm bed, you can use materials like dead leaves, shredded newspapers, hay, and compost. Some farms may come with bedding blocks. You will need to soak these blocks in warm water and spread them on the bottom tray of the farm.
5 best worm composting kits to shop for
Here are some worm composting kits you can shop for:
FCMP Outdoor - The Essential Living Worm Composter

Features: BPA-free, UV-inhibited recycled polypropylene, aeration support points
Made from BPA-free recycled polypropylene, these worm composters are sturdy and easy to set up, even if you are new to vermiculture. They are also compact, making them just right for small apartments. They come with multiple trays and a moisture control water retention channel around the outside of the trays to collect water and prevent the bedding from drying around the edges. This composter also has 52 angled migration tunnels to help worms migrate between the trays.
For proper 360-degree airflow, this worm composter also comes with aeration support points to ensure your worms thrive.
Check Price on Amazon or Shop Direct
Tumbleweed - New Worm Factory

Features: 100% recycled plastic, 2x large capacity working trays, snap-in legs, lid design with air vents, collector tray, coir brick
If you love gardening, you may love this worm composter from Tumbleweed. Made from 100% recycled plastic, this worm composter is compact and perfect for your garden or balcony. It comes with two working trays and a collector tray to collect the tea. It is easy to assemble, thanks to its leg design.
It also comes with a curved hinged lid and large lid vents for good airflow and circulation. The working trays are also well-improved and don’t require vent clips.
Brothers Worm Farm - Stylish Urbalive Compost Bin

Features: stackable tray system, FSC-certified hardwood leg, accessories including how-to guide, measuring clip, and hand shovel.
If you’re looking for a stylish composter for your small space, you may just love this compost bin from Brothers Worm Farm. This modern worm compost is both stylish and compact.
Although compact, it comes in a stackable design that you can expand with an additional four trays. It has hardwood legs that are FSC-certified. It is easy to set up, move around your house and maintain. You can easily add compost materials like vegetables, fruits, cardboard, and so on.
Brothers Worm Farm is a brand committed to making your vermicomposting journey a great experience, thanks to their worm farm products.
Check Price on Amazon or Shop Direct
The Squirm Firm Worm Factory 360 Composting Bin
Features: High-quality recycled plastics, odor-free operation, stacked trays
You can say goodbye to the smelly backyard composting pile thanks to this efficient solution from The Squirm Firm. This kit comes from recycled plastics with worm bedding materials, four stackable bags, a worm ladder, and a built-in spigot.
This bin is easy to set up, use and maintain. All you need to do is fill the base tray with worms, food waste, and bedding. You can add more trays as more worms emerge and migrate from the bottom tray to the top.
It also has an improved base and lid design to allow proper air circulation and ensure it is odor-free. The base comes in a worm ladder to help your little worms return to the composting area when they fall into the tea collector. This kit also comes with an instruction guide for easy set-up.
The Squirm Firm - Worm Composting Accessory Kit
Features: worm compost PH + moisture meter, thermometer, turning claw, harvesting scraper, food scrap handling tongs
Your Vermiculture journey isn’t complete without an accessory kit. For successful worm composting, you must regularly check the conditions of your compost bin. Sadly, an unfavorable temperature can mean bad news for your worms.
This kit contains all you need to ensure your worms work and provide all the benefits of rich compost. It has a thermometer, moisture meter, + compost PH to ensure your worms thrive at the right temperature. It also comes with a turning claw, handling tongs, and a harvesting scraper to feed your worms, turn your bed, and harvest them.
Steps to setting up your own worm farm
Setting up your farm isn’t a herculean task, and you can make your own with the right tools so you can grow healthy worms. Here are steps to get you started with worm farming.
Step 1: Get the materials you need
According to the United States Environmental Protection Agency, here’s what you need to set up your farm and start worm composting.
- Plastic bins: You will need to get two plastic bins. The first bin should be taller and should have a lid. The second plastic bin should be shorter and come without a lid. Your bins should be dark in color and shouldn’t be transparent. This is because worms don’t thrive with light.
- Drills: You also need a drill to drill holes into your top bin.
- Screening material: You will need screening material. The type of screens on windows will work just fine, avoiding metal that can rust.
- Shredded paper: You will need enough non-coated papers to fill up your bin at least three inches deep.
- Waterproof glue: This is to keep your screens together even after it gets wet.
- Dirt and some water to moisten the paper and dirt
- Trowel: You will need a scoop to move compost into the bin.
- Container (for food scraps): You will also need a food scrap container to gather fruit and vegetable scraps.
Step 2: Prepare your bins
To prepare your bins, drill a hole around two inches from the top of the large bin on one side. Then make another hole on the opposite side of the bin. Next, drill another ⅛-inch hole close to the bottom corners of the bin.
Next, use your screening material to close the holes in your bin using waterproof glue to keep them in place.
Lastly, place the taller bin into the shorter bin. You should not drill any holes in the shorter bin.
Step 3: Prepare your worm bed
After preparing your bin, the next step is to prepare your worm bed. Start by adding a newspaper or cardboard paper layer to the bottom bin.
Next, add some compost. Simply add scraps like coffee grounds, fresh manure, leaves, crushed egg shells, and other materials to make your compost. If your fresh manure contains weed seeds, you can still add them to the mixture.
Next, grab your trowel and turn your compost. After you’ve added enough compost, proceed to add food scraps like vegetables and fresh food like citrus fruits.
Step 4: Add your worms
After creating a moist environment for your worms, proceed to add them to your bin. Ensure you spread them out to keep your worms happy.
Next, get sheets of moist newspaper to cover your worms. This is because worms do not work well with light or exposed food. They will only feed on covered food scraps.
Step 5: Create a feeding schedule for your worms
The best feeding method is to feed your worms daily. You need one pound of food daily for every two pounds of worms.
Gather different kitchen scraps like vegetables, fruits, and cereal grains and add them to your food scrap container. Avoid animal by-products like dairy and meat.
Add some worm food to your bin and ensure you cover it with moist paper, as uncovered food can attract fruit flies. Pay attention to foods your worms eat and remove scraps your worms don’t eat.
Step 6: Preserve your farm and harvest compost
After a few months, scoop the liquids out of your container. As the compost from your worm castings continues to grow, swap the top bin with the second bin.
Add new layers of worm bedding to the swapped bin and start adding food again. The worms in the second bin will begin to go up to the top, leaving the compost behind.
Once all the worms migrate to the top, you can then harvest the compost at the bottom and use it for your potted plants or soil. You can also collect the live worms and use them as fishing bait, sell them, or help other budding vermicomposters get started.
Selling worms
Worm farming comes with many benefits. Aside from getting rich compost for your gardens and soil, you can also sell your worms. You can sell them directly to fishers or sell to them via bait shops.
Package your worms in a fitting container with a tight lid. Add some rich, moist soil to give your worms the perfect thriving environment. Poke some holes in your container to allow air into the container. Don’t add too many worms to your container. Pack as little as a dozen in one container. Once done, set your prices based on the market price and sell to convenience stores and bait shops.
You can also sell more than just worms. You can sell your worm tea, also known as worm-casting leachate, to organic farmers as great fertilizers. You can also sell organic compost to growers or individuals for gardening.
Conclusion
Now you know how to start a worm farm! You can create a natural product with a successful worm farm that makes you a decent profit. You can also get nutrient-rich materials for fertilizing your garden or lively worms for fishing. Either way, a worm composting farm has many benefits that can last for many years.
Jen’s a passionate environmentalist and sustainability expert. With a science degree from Babcock University Jen loves applying her research skills to craft editorial that connects with our global changemaker and readership audiences centered around topics including zero waste, sustainability, climate change, and biodiversity.
Elsewhere Jen’s interests include the role that future technology and data have in helping us solve some of the planet’s biggest challenges.
